
Texture Organizer for UE 5
A tool to organize textures in Unreal Engine
Using textures from various sources in Unreal Engine, the organization of the texture files can quickly become a frustration: Everyone has different ideas on naming conventions, how to structure a Control Texture (if any..), which Normal Map setup to use (if any..) and don’t get us started on sources that are not power-of-two.
The idea behind this tool is to keep the amount of clicks to an absolute minimum. This means that “one drag, one click” is all it takes to take your textures from their current messy form to a neatly organized texture folder.
Rinse, repeat.
First Steps
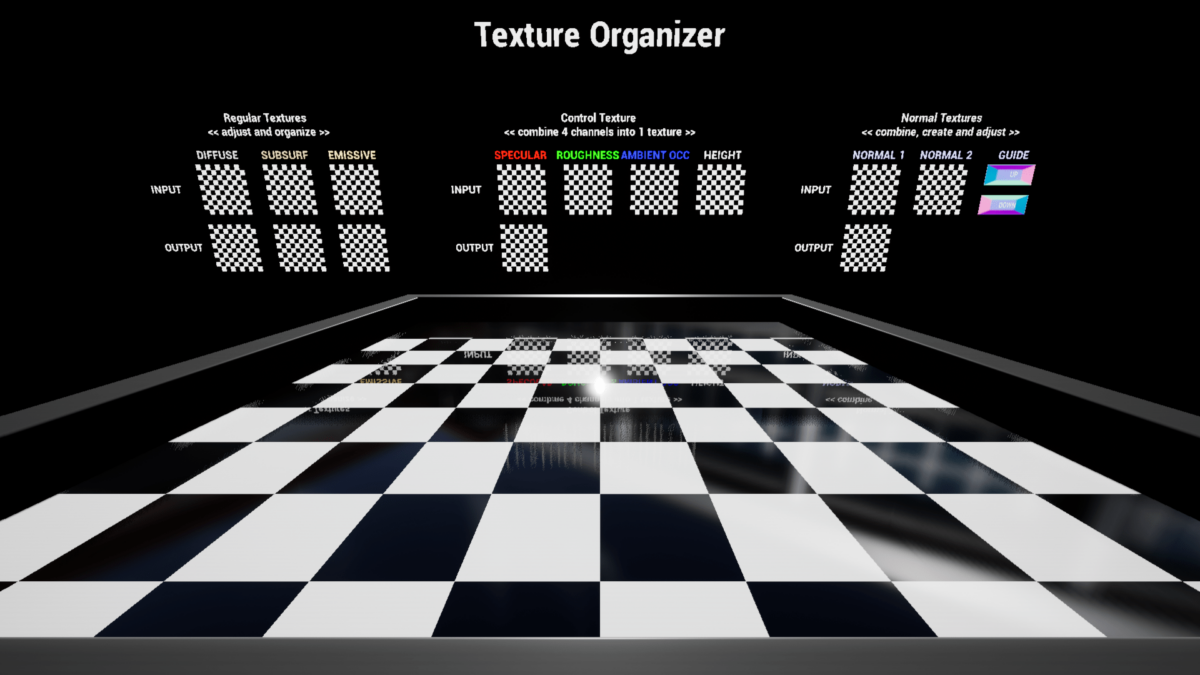
After adding the TextureOrganizer to your project, the easiest way to start using the tool is to simply open the provided map. The map only has one Actor, which is our main blueprint, which (in perpendicular view) looks like this:
The key way to interact with the blueprint is to change settings in the details panel (usually located at the right of the screen). The blueprint as seen in the viewport is only used to preview the current INPUT and OUTPUT textures. The OUTPUT textures are just previews, so they don’t represent an actual texture. By saving the result, the results as seen in the OUTPUT sections will be written to a folder in Unreal Engine.
The reason for this setup (ie. no interaction with the Blueprint in the viewport) is that this way the tool can be used straight in the editor, without having to enter any Play Mode.
- Drag, from your staging folder (or current texture folder), any texture of a material onto any of the texture slots in the details panel
- Check if all textures are recognized and put in the right place and if the correct “Base Name” is generated
- Click “Save Textures” to write the result to the “Output Folder“
Drag, Drop, Save
The Details Panel has several (numbered) sections that can be closed and opened.
- 2. Control Textures
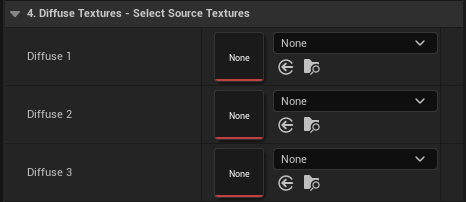
- 4. Diffuse Textures
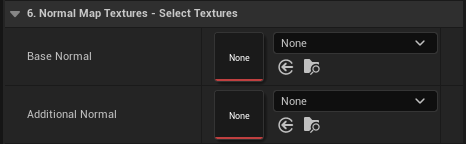
- 6. Normal Map Textures
All buttons are placed in the “Default” section as shown, and pretty self-explanatory.
Changed from v1.xx, the button “Save Textures” will now also clear all textures (saving another click if you’re processing multiple sets)
The “Refresh” button will (re-)generate the preview material and images. This is needed to visualize any changes in the soft settings of Diffuse / Normal textures

A few words about Unreal Engine 5
- Coming from an older version of this tool, you will notice that a few things have changed, transitioning to UE5. For the most part, this is because of a fundamental difference in the way the new version stores texture files:
- In UE4, storage size is (more or less) equivalent to PNG
- In UE5, storage size is (more or less) equivalent to the source file
So if the original file is a 4K JPG of, say, 5MB, in UE4 it typically takes up 15-20MB while in UE5 the size is close to the original 5MB. A big saving!
Texture Organizer (v2.00 and above) tries to re-use the input format to make the best use of this new storage method, but reverts to the (old) method of creating a (PNG) render target if:
- Texture Width / Height is changed
- Any of the ‘hard’ settings of the texture are changed (e.g. re-color, blur, etc)
- If textures are combined (multiple normal maps, control texture..)
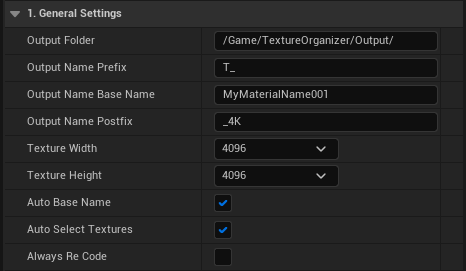
General Settings
- Output Folder is the location where the results will be saved
- Prefix and Postfix will be added at the start & end of the texture name
- The Base Name will be automatically generated if the checkbox is checked
- Texture Width & Height can be selected, but only in powers of 2
- “Auto Select Textures” will automatically be checked when there are no textures present in any slot and vice-versa. This can be disabled in Advanced Settings
- “Always Re-Code” forces the tool to create a render target (PNG) and take it as input instead of the original (see also ‘A few words about UE5’ above). If left unchecked it will try to re-use the input texture directly.
How does the tool recognize Texture Files?
It’s all about the name of the file.
We analyze the first texture that is dragged into a slot and split the current name into pieces attempting to find a search name:
- Remove any Postfix (like “4K“) as listed in PostFix String Array
- Remove matching Suffix (like “Roughness“) in as listed in “TextureSearch” Data Table
- Add any Suffix as listed in “TextureSearch” and the Postfix from before and check if the file exists
- Try with any Separators as listed in Separators String Array (ie. space, dash, underscore)
How does the tool recognize Texture Types?
Again, it’s all about the name, but now we focus on the Suffix.
When a texture is recognized by the Suffix listed in “TextureSearch” we know also where it should be placed by looking at the Function listed in the table. We also know if we should invert the data.
- Look for a matching search name
- Place the texture in the right slot
- Remove the match from the Suffix
- Repeat
Note that the sequence of entries in the MultiSearch table matters here. We start by looking for the longest string and end with the shortest.
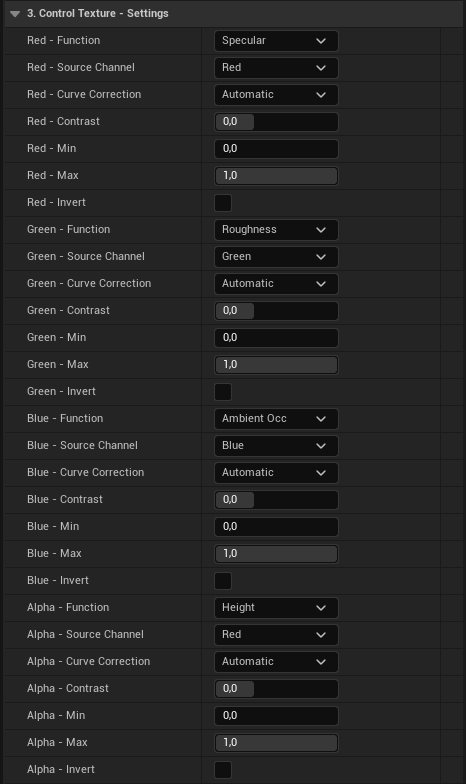
Control Texture Settings
- Function is the role the channel should have in the final material. Changing this will have an impact on the Auto-Search function (it will try to assign a texture with that function), but also on the Suffix when saving the result.
- Source Channel sets the channel that will be read from the assigned texture. This is mostly important when using another Control Texture as input since the data of each channel will be different. Often when you import source textures, things like “Roughness” will be black & white data. In that case, just make sure you don’t set this to ‘Alpha” because it will be empty.
- Curve Correction can normally be left at Automatic. It corrects for data being read as sRGB while stored as Linear or vice-versa. Since our Control Texture will be set to Linear (unless you change that, if you dare), the curve needs to be corrected. One case where you might play with this value is if your Ambient Occlusion was tuned for the sRGB curve.
- Contrast does what it says on the tin. The default is 0 (no change), -0,5 removes all contrast and going higher than 1 is only for the very brave.
- Min/Max sets the range the texture can occupy. Very useful to fine-tune your controls. You can go beyond 0..1 to ‘clip’ the range but you loose detail so why would you do that?
- Invert is a neat little trick that just switches the roles of Min/Max. In some cases this is triggered automatically, like when automatic texture assignment puts a Gloss texture in the Roughness slot.
Oh, and here’s a useful thing to know: When no texture is assigned to the Alpha Channel, the resulting Control Texture will be half the size (see the texture compression explainer below), but also slightly lower quality (like.. just the default quality.. ugh…).
Did you know about.. Texture Compression
- Red: 5 bits
- Green: 6 bits
- Blue: 5 bits
- Alpha: 16 bits
- Red: Specular or Metal
- Green: Roughness
- Blue: Ambient Occlusion
- (Alpha: Height)
- Toggle “Compress Without Alpha” on the fly saving half the space without having to reimport
- Tick the “Flip Green Channel” box if you accidentally authored your Roughness as Gloss
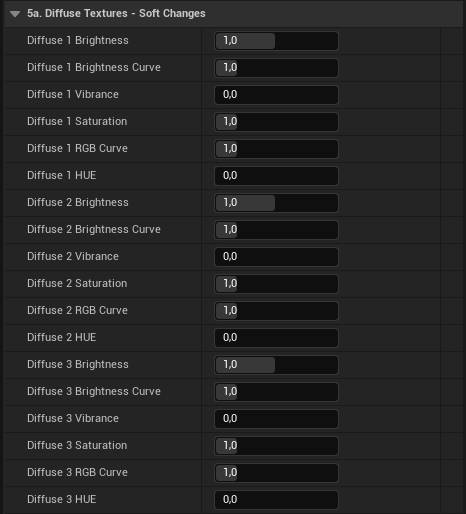
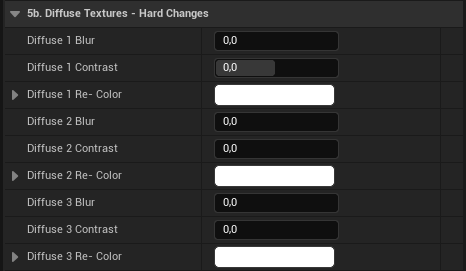
Diffuse Texture Settings
- Brightness (1=no change) is a simple multiplier on the RGB values
- Brightness Curve (1=no change) raises the HSV values the set power
- Vibrance (0=no change) adjust the HSV saturation algorithm
- Saturation (0=b/w, 1=no change, 5=max saturation). Useful when re-coloring (try to use a b/w image as a base) or to add intensity for Emissive / Sub-Surface textures.
- RGB Curve (1=no change) raises the RGB values the set power
- HUE (0=no change) Offsets HSV Hue by set value in degrees
- Add Blur (0=no blur, 1=total blur) to the texture. Useful for Sub-Surface textures mostly, but available everywhere, because.. you paid for this, didn’t you?
- Increase Contrast (0=no change, 1=max contrast). Does what it says on the box. Zero contrast is reached at -0.5.
- Re-Color. Set to high values (2,2,2) to increase general brightness or low values (0.2, 0.2, 0.2) to darken. Or set a color to make more dramatic changes. This can be useful also for Diffuse (changing the paint color of a material for example).
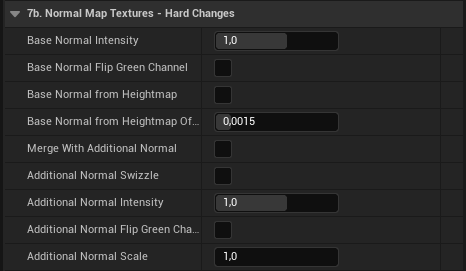
Normal Texture Settings
- Just use what you have. You can change the intensity (to avoid extra instructions in your material), flip the green channel (to avoid doing that manually in each Normal texture)… and that’s it. Just make sure not to flip the green both at export and on the Base Normal because you’ll end up where you started.
- Merge with additional normal. If you’re not very happy with your normal map and want to add some detail (realistic scratches on a wooden floor anyone?), you can add a second normal and merge them. Again, you could do this in your material as well, but you’d need extra instructions for that. The additional normal can also be scaled (easy..) or swizzled (surprisingly tricky)
- Create from heightmap. If you don’t have a normal available at all, you can just create one here, directly from a heightmap. You need to assign a heightmap to a slot in the Control Texture for this to work, and you can still merge the result with an additional normal in one step. Neat.
- Just one note: if you want to create and merge, do the creating first (and de-select merge while you do that). That way you see the assigned heighmap in the preview. Oh, and play with the heightmap Offset to tune the result.

Did you know about.. Normal maps
You probably know that Normal Maps are those funny-looking purple textures that you kinda have to use in your materials to make them look good.
Things quickly become a bit confusing when you try to make them yourself, or work with them in Unreal Engine.
What do they do?
They adjust the angle of reflection on an otherwise flat surface, imitating mesh detail that is in reality not there. So, in essence, they are a cheap way of showing just (tiny details of) height data. This means that if we use a heightmap as input, we can generate our normal map.
How are they different?
Normal Maps (with DX5 / BC5 compression) are the same size as full RGBA textures (with DX5 / BC3 compression), but they only store 2 channels of data (R&G channels). So what gives? Well, since the quality of the normal map has such a large visual impact it uses double the precision to store the data. Half the channels, double the data per channel. Same total size (for a more detailed explanation, check out this handy video).
You can think of it this way: Normal map data (in Unreal Engine), goes from -1 to +1 on both channels (x and y, or r and b). That’s a range of 2. That’s double the range of a regular channel (that goes from 0 to 1). So you double the precision to be equally precise (*).
It’s always more complicated
As usual. It gets more complicated. There’s also data in the Blue channel of the normal map, but it’s free! How does that work? As so often in life, that’s because of Pythagoras (heh, interested to watch the helpful video yet? It’s all there..). The Z can be derived from just knowing X and Y, which is done automatically by Unreal in the background.
((*) not really how this works, but still not a bad way to think about it. In reality the BC5 compression just works differently from BC3, but I didn’t really want go there)
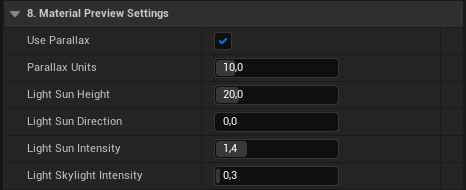
8. Material Preview Settings
To make things more fancy-looking, we figured it would be helpful to have a dynamic preview of the material you create with all these textures. Enter: The Material Preview.
- Diffuse, Emissive, Sub Surface
- Metalness, Specular, Roughness, Ambient Occlusion
- Height Map (through Tesselation or Parallax or both)
- Normal Map, created or imported
- Secondary Normal map
Just play with the Light settings (like rotating the Sun Light) to see how your material looks under different conditions.
Sidenote: Parallax strength is ‘normalized‘ to Unreal units (cm). They can be used together or separate.
Another Sidenote: Tesselation is not available in UE5 and has been removed from the tool.
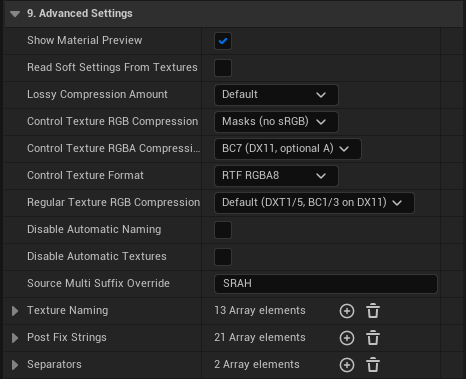
9. Advanced Settings
Usually we would ask you in a calm, reassuring tone of voice to stay away from this section. But if you insist.. Here it is. We won’t let you go without enlightening you with some recommendations though:
Read Soft Settings From Textures:
When loading a new texture set, you can either retain the current Soft Settings (ie. unchecked, if you want to apply similar settings to many texture sets) or read the values each time from each texture (ie. checked), to avoid losing previously set values.
Lossy Compression Amount:
Doesn’t affect the editor, but sets the engine to package using Oodle compression (leading to smaller packages and quicker load times). Use this setting to default all processed textures to the selected compression level.
- BC1 recommended for size (it matters!).
- BC7 if size matters less than quality and you target DX11+
- Choosing Masks instead of Default BC1 avoids some issues with sRGB (more specifically: it disables sRGB, preventing the curve from being applied), so that’s the default choice.
- BC7 recommended if you target a DX11+ platform for increased compression quality.
- Otherwise BC5
If for some reason you need to go for sRGB, you should set it here also. The sRGB curve exists for a reason (to avoid color compression artifacts). Keep in mind that if you’re going to work with other formats like 16bit float, the above recommendations don’t apply but it should still work. Of course you will get larger file sizes
- The automatic features are triggered if there are zero textures assigned and you drag the first texture
- Here you can disable that automation
- Even when disabled, you can click the checkbox (in 1. General Settings) to trigger the automation.
This is a tricky one. We tried to give it a clear name (but failed.. miserably).
Anyway.. There is this (bad) habit of people using “_Control” as a suffix in their texture name. Of course, we can’t automatically know the role(s) of the channel(s) in that case, so you can put it here. “SRAH” would have Spec, Rough, AO, Height in RGBA respectively.
This setting, thus, only has an impact on automatic assignment of existing Control textures that have the suffix ‘_Control‘. There it is. Let me know if you come up with a better name for it.
Data Tables
- TextureSearch_Data
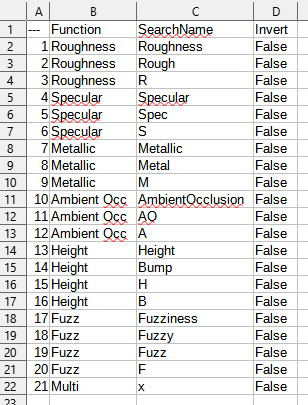
- MultiSearch_Data
They both come with a CSV file that you can open and edit in a spreadsheet. Just right-click and select “Reimport with new file” and browse to the file in Unreal when you’re done (we put the originals in ‘/TextureOrganizer/Blueprints/Data/’, they might be in a zip).
Why didn’t you just put the data in an array so you can easily edit directly in the Blueprint you ask? Well, because copy-pasting multi-column values is easy in a spreadsheet and super annoying in Unreal. That’s why.
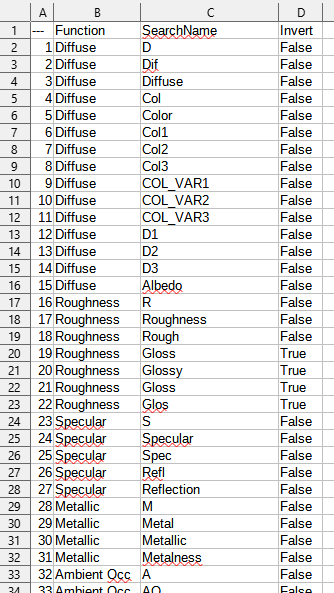
Texture Search
During automation (so after drag-dropping the first texture), the tool will first try to place the first texture correctly and then look for additional textures (in the same folder that the first texture was from).
It looks for these textures by composing filenames and see if the corresponding file exists.
- The ‘SearchName‘ column refers to the part that’s used in composing a filename
- The ‘Function‘ column tells you the function (and thus the slot the texture should be placed in) if a match is found
- The ‘Invert‘ column.. Well yeah.. it inverts the values (making a Gloss map into a Roughness map for example).
- We have to find a complete match for a texture to be picked up, separators and all. So ‘MyTexture_Rough_4K‘ will work, where ‘MyTextureRough_4K‘ or ‘MyTexture_Rough4K‘ will not.
- Capitalization matters! For each entry, we’ll try to find ‘As-Is’, ‘Lower’ and ‘Upper’ case versions. So ‘MyTexture_rough_4K‘ and ‘MyTexture_ROUGH_4K‘ will work, but ‘MyTexture_RouGh_4K‘ will not.
- The ‘Invert‘ column.. Well yeah.. it inverts the values (making a Gloss map into a Roughness map for example).
- Unlike MultiSearch, the order of entries does not matter much (putting the most frequent entries at the top will be slightly faster).
Multi Search
After finding a match with ‘Multi’ function we have to take another step to assign the texture to slot(s): Understanding which Channel of our Multi texture goes where.
But first: To end up here (in MultiSeach) we have to find a complete match in the previous TextureSearch section. This is slightly unfortunate (because we had to make a lot of entries in TextureSearch for this, like SpecularHeightRough and HeightRoughSpecular and so on) but being explicit is the best way of avoiding mismatches.
…aaanyway..
Now that we’re here, basically we just go from top to bottom in the MultiSearch table and from left to right in the MultiSearch string. Each time we find a match we process it, remove the (sub)string and proceed to find the next. This means that the sequence in this table does matter. You want to look for longer strings first and shorter strings later.
Now that you’re aware of this, I think you’ll be fine. Did I say that you’re awesome?
You're awesome! We'd like to ask you for a favor
No worries, I’m not going to ask you for money.
But, just, wow. You made it.
This is the end (my only friend, the end).
That either means that you have incredible patience, you are a really big fan or you were looking to solve a problem with the tool. In all of these cases we would love to hear from you!
You know, the way it works with tools on the Unreal marketplace is that they need reviews or Q&A’s to become popular <<<I guess you see where this is going>>>. The point is, we’d love a shoutout. With questions, comments, compliments, raving reviews.. the works 🙂